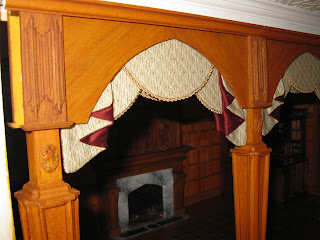
I hope you had a great weekend! I finally finished the arches in the great room! I hope the following directions are clear...in my defence it's past my bedtime!
I'm very happy with them, but I must admit making the valances was much more trouble then
I thought it would be.
I knew the fabric I bought would cause me trouble the minute I touched it. Most miniaturists have always warned to use light, all nautral fabrics for miniatures. This one was a heavy upholstery fabric, 75% polyester and 25% cotton. The only reason I bought it was because, no word of a lie, it was almost exactly what I had imagined for this room...from the color to the pattern it was perfect. I figured I'd rather simplify the valance design and drapes then not use this fabric.
I took out my columns and pieces for the arches and tried out a few designs and found one I liked. Next I cut out all the fabric pieces I would need with a cardboard pattern I made up.
There are 3 double sided arches so I cut 6 big valance frames in illustration board, one for each side, and 6 small half round pieces for the center of the valances.
I cut out 12 triangles in my green fabric and 12 in a burgendy accent fabric. I tried using one of those iron on adhesive tapes to glue the pieces together. When I finally finished, 2 hours later, the tape didn't work and they came apart! After using every Italian, French and English swear word I know ( my southern Italian heritage really came out) I had to take out my sewing machine and go over the 3 sides of each piece. Naturally, I was out of upholstery needles so the thread kept on breaking! I finally finished sewing, flipped them inside out, ironed them flat, then folded them the way I wanted, ironed the folds and pinned them to a pillow to let them keep their shape.
Because the fabric I used was so thick the glue did not go through it. So I completely covered one side of the valance frames and half rounds with The Ultimate glue, put the fabric over it and smoothed it out. I then flipped each piece, ran a line of the glue all around the edges, then folded over the fabric edge and glued it down tight.
Then came assembly:
I glued 2 fabric covered frames back to back
glued on a half round in the center on each side,
added a wood strip spacer in the center on each side,
added gold braid trim around the valence,
glued the folded triangles at each end,
and finally glued on the wood arches over that.
After I glued down the columns, I glued the arch pieces I just described to the top of the room with the Ultimate glue and gel super glue. I then covered the small gaps between the column and the arches with small wood panels with linen fold carvings I made. Then came a piece of ogee molding to top it off.
The final touch was inexpensive plastic cameos I purchased and painted to match the columns.
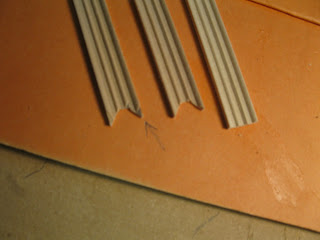
The linen fold carvings I made with my door frame molding. It's hard to explain..On the right is the molding, in the center I cut out a notch...almost like a triangle with no point on the top, and in the left picture, I removed just the top part of the molding (follow arow and I penciled in the exposed area)...I hope you understand with the pictures
Well, that was it for this week...there is so much to do I'm not sure what to do next...
I hope you all have a great week,
Giac


You did a great job with that difficult fabric. But that trick you did with the linen fold...so very clever!! I don't think I would have ever thought of doing it that way. It looks very very good! Thank you for sharing this idea.
ReplyDeleteA wonderful job, Giac! Although you have is difficult to make, the end result is sensational! Congratulations!
ReplyDeleteGiac, è bellissimo! hai fatto un lavoro incredibile.Non è proprio il mio stile ma sta venendo fantastico !!!
ReplyDeleteGood Morning Giac!
ReplyDeleteGenious! That linenfold paneling is sheer Genious! I am so impressed........
The Drapery treatment looks amazing as well. Polyester in a fabric blend is not easy to work with. Your end result is great. What a difference in the look of the greatroom to have the columns and arches in place.
Looking forward to the next installment of "Late Victorian English Manor House"
Hope your week is great!
Ray
Happy Monday everyone. Once again thank you so much for starting my week off on such a great note! You make blogging fun!
ReplyDeleteI've said it before, I'm so happy my blog is giving others ideas, and I'm very proud to get such wonderful feedback from such talented people who's skills I respect immensely!
Thank you all so much,
Giac
Brilliant! Very impressive.
ReplyDeleteThey look fantastic!!! What a beautiful job you have done. Thank you for telling us how you made them.
ReplyDeleteA pesar de las dificultades el resultado ha sido extraordinario, enhorabuena. Un saludo, Eva
ReplyDeleteGiac, This is so incredible! You have done a fantastic job on the valances!! Your house will be such a masterpiece when it is finished! You have such fabulous skills and the details are outstanding!!!!
ReplyDeleteWhoua , impressionnantes ces colonnes et un beau travail de tapisserie !
ReplyDeleteWOW, Giac! This room is amazing! Your creativity is awe-inspiring...can't wait to see more!!!
ReplyDeleteI started following your blog a few weeks ago and finally caught up reading all your posts. Your house is stunning and I love all the details that you are putting in it. I also like using Lego to keep things square, they come in very handy for all kinds of things. Thanks for all the wonderful tips along the way, that's what I like about this hobby, everyone sharing ideas so freely.
ReplyDeleteCiao Giacomo,
ReplyDeleteYou are able to capture the essence of Victorian aesthetics ...
An amazing job! Your patience is also demonstrated by yours explanations meticulous and detailed, thanks :-)
Mini abbracci, Flora
Hi Giac,
ReplyDeleteYour great room looks wonderfull....really like the curtains between the columns. I understand that you really wanted this fabric! Also the tric of the linen fold carving is really good....I hope try it someday myself.
Again thanks for shareing
Hello everyone,
ReplyDeleteThank you so very much for your very kind comments. After all the hard work your comments are very touching.
I am so thankfull my blog gives people ides and if ever instructions are not clear please don't hesitate to ask. I think one of the best aspects of our hobby is how people share what they know with other.
I wish you all the best,
Giac
Ciao,mi chiamo MelyG,ed ho appena scoperto il tuo blog.Mi piacciono tantissimo i tuoi lavori,sono davvero perfetti e molto accurati, la scala mi ha davvero impressionata!
ReplyDeleteUn abbraccio
Mely
Hello Pedrete,
ReplyDeleteI just sent you an email. You can contact me anytime you want.
Giac
OMG! Your house is so realistic and has so much attention to detail. I am making my first one... ever. NEver even made a kit and have no carpentry skills. BEsides putting mine to shame you have given me lots of wonderful ideas I can use at some point in the future when I become somewhat accomplished! Well done. Looking forward to seeing it in all its glory!
ReplyDeleteHi Giac, I am so inspired and very grateful that you explain what you are doing. I am now feeling really confident about my bookcases for the library I am doing. I am in Australia and it is a very small industry, so you blog is a fantastic help.
ReplyDelete