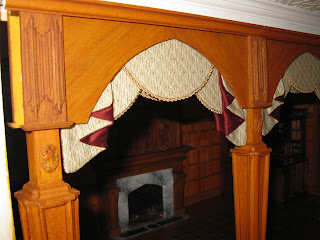
I hope you had a great weekend! I finally finished the arches in the great room! I hope the following directions are clear...in my defence it's past my bedtime!
I'm very happy with them, but I must admit making the valances was much more trouble then
I thought it would be.
I knew the fabric I bought would cause me trouble the minute I touched it. Most miniaturists have always warned to use light, all nautral fabrics for miniatures. This one was a heavy upholstery fabric, 75% polyester and 25% cotton. The only reason I bought it was because, no word of a lie, it was almost exactly what I had imagined for this room...from the color to the pattern it was perfect. I figured I'd rather simplify the valance design and drapes then not use this fabric.
I took out my columns and pieces for the arches and tried out a few designs and found one I liked. Next I cut out all the fabric pieces I would need with a cardboard pattern I made up.
There are 3 double sided arches so I cut 6 big valance frames in illustration board, one for each side, and 6 small half round pieces for the center of the valances.
I cut out 12 triangles in my green fabric and 12 in a burgendy accent fabric. I tried using one of those iron on adhesive tapes to glue the pieces together. When I finally finished, 2 hours later, the tape didn't work and they came apart! After using every Italian, French and English swear word I know ( my southern Italian heritage really came out) I had to take out my sewing machine and go over the 3 sides of each piece. Naturally, I was out of upholstery needles so the thread kept on breaking! I finally finished sewing, flipped them inside out, ironed them flat, then folded them the way I wanted, ironed the folds and pinned them to a pillow to let them keep their shape.
Because the fabric I used was so thick the glue did not go through it. So I completely covered one side of the valance frames and half rounds with The Ultimate glue, put the fabric over it and smoothed it out. I then flipped each piece, ran a line of the glue all around the edges, then folded over the fabric edge and glued it down tight.
Then came assembly:
I glued 2 fabric covered frames back to back
glued on a half round in the center on each side,
added a wood strip spacer in the center on each side,
added gold braid trim around the valence,
glued the folded triangles at each end,
and finally glued on the wood arches over that.
After I glued down the columns, I glued the arch pieces I just described to the top of the room with the Ultimate glue and gel super glue. I then covered the small gaps between the column and the arches with small wood panels with linen fold carvings I made. Then came a piece of ogee molding to top it off.
The final touch was inexpensive plastic cameos I purchased and painted to match the columns.
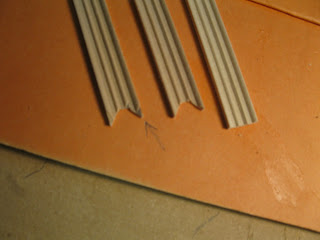
The linen fold carvings I made with my door frame molding. It's hard to explain..On the right is the molding, in the center I cut out a notch...almost like a triangle with no point on the top, and in the left picture, I removed just the top part of the molding (follow arow and I penciled in the exposed area)...I hope you understand with the pictures
Well, that was it for this week...there is so much to do I'm not sure what to do next...
I hope you all have a great week,
Giac


