Hello everyone,
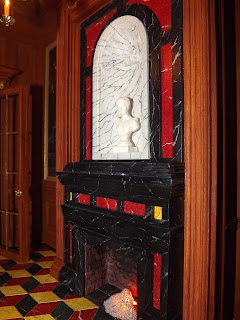
I hope you are all doing well. Thank you all once again for your great feedback last post. I had not expected to go so long without an update, but I underestimated the level of detail in these rooms and real life has, yet again, been hectic and exhausting. Work on the new wing is going well and I present to you the Earl's study and the Banquet hall staircase.
 |
| The fireplace in the earl's study |
 |
| The study |
 |
| The staircase |
Marble floors
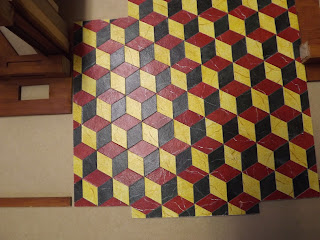
Last post I had just painted illustration board to look like red, yellow, green and black marble.
 |
| You saw this one last time |
The next step was to cut them and glue them onto a single ply illustration board subfloor. I chose the cube pattern, one of my favorites.
Cutting them was time consuming but not difficult. The problem started when I glued them down. I had 2 sub-floor templates, one for the study and one for the staircase hall. I used the Ultimate glue for the study floor and it worked really well. However some of the glue kept coming up between the cracks when I placed the tiles, so for the staircase floor I used an Extra Strength Glue Stick.
I put the tiles down and weighed them overnight with weights and heavy books. When I went to trim the tiles that were hanging off the edge many of them came undone. If you look at the strip of flooring on the left in the last picture, you can see where the tiles came off the white subfloor. Not the end of the world, but do not use glue sticks! I must have been tired because I messed up the last row of the study floor. I inverted the yellow and green titles. I just cut off the row ande made a black marble border around the room to make up the difference.
The earl's study
With the floor done I started putting together the rooms. I did one last test run to see if any mistakes jumped out at me.
It looked good, so all that was left was gluing everything in. I started by the wall panels and weighed them down 24 hours to make sure the glue set and the pieces did not buckle. Then I glued the paintings in place and added trim
I had shown you the fireplace before, but the red marble I had made did not match the one on the floor. It was too pink.
I pulled it out, praying the fireplace would not be damaged, and replaced it with the same "marble" I used for the floor. I think it looks better.
The final step was the ceiling. It is a piece of faux-walnut finished illustration board with rectangles cut out of it which I glued over the mdf structure which I painted dark green.
I added a cornice, frieze and cove molding around the room, and I trimmed the cutouts with the cove molding as well. And voila!
I think I will purchase short bookcases for the walls each side of the fireplace. The 2 vitrines I intended to use looked too massive.
Staircase and bathroom
The elements for the staircase were all ready, so, as with the study, I had one last test run.
You can see the beige walls for the bathroom at the back of the room. I made sure everything aligned properly and glued the wall panels in first, then the floor, the staircase and finished with trim and the painted panels.
I glued the elements in the above picture before I installed the wall that separates the 2 rooms.
In the picture above you can see I used a 10 pound hand weight while waiting for the glue to set. Before the wall panels were installed I measured and glued the molding onto the murals. They had odd angles and trimming the picture frame molding for each piece after the paintings were glued into place would have been a nightmare. This way a line of The Ultimate glue all around and a few drops of gel super glue were all that was needed to glue the paintings in. I mentioned that I made the space under the landing 2 inches deeper to create the illusion of a bathroom. The platform was now too short so I made a built in bench to cover the gap. There will be a window on this landing.
I have not glued in place the second part of the staircase because the would mean I could not put the structure upside down to work on the other rooms. I will post pictures when it is done, but for now here is what the staircase looks like with a piece of cardboard to cover the opening above the staircase.
I really like this room, but after the wall separating it from the earl's study was up you can only see little parts of it at once.
 |
| The camera was in the study, so your actual view is a little more limited... |
 |
| ...but I know it is all there and when the light is on it actually adds a lot of realism to the flow of the house |
 |
| This is a view through the door of the unfinished library next door |
The room under the stairs was wasted space so I decided to make it look like a small bathroom. I built a window unit with a stained glass window which has a ledge on which I can put a few towels.
The stained glass is a plastic piece I purchased at a Tiffany Glass exposition at the Montreal Museum of Fine Arts a few years ago. The window piece is not glued into place...
...so I have access to the room in case of repairs or if I decide to add a sink or some other element. The piece cannot come out of the room as it is taller then the opening, but It works well enough and the stained glass looks quite nice when backlight
 |
The floors were leftover marble tiles from past rooms in the manor
|
As I mentioned before, you can only see this room through the doorways in the study and the library. Sadly, you cannot see it from the back as the house is against the wall, so here are a few pictures to remember what is actually behind the study.
Montreal Miniature show purchases and birthday gifts
The first weekend in April was the Montreal Miniatures show. Martha and Julie came over the Friday before the show and we had a wonderful visit. Jo came with me to the show and we had a lot of fun...and I shopped.
 |
| 2 of the arrangements and the apples I purchased from Martha Mclean Miniatures, the lilacs ,also made by Martha, were bought from Grandpa's Dollhouse, and the white lilys were a present from Martha |
 |
| I purchased the dish set and cake stand from Julie at Westwinds Miniatures, and she surprised me with the shaving set |
 |
The swan dishes and clown are by Janice Crawley and the vases were purchased at an estate sale table.
|
I love shopping at the miniature show, but even more fun was getting my birthday present last week. Jo got both families together again and they bought me a limited edition bird handle copper pot set from Janson and Jacqueline Getzan, as well as a few other kitchen items he knew I was hoping for.
And that is all for this post. I have cut the subfloor for the library so the next step is cutting the wood parquet. I have also been working on futur plans which I have mentioned before...Banquet hall, kitchen renovation... I did make one big decision though: when the present rooms and plans are complete, I am adding a basement floor to the manor for servants quarters, laundry room, linen cupboards, scullery, larder, cellar....This project will never end.
Thank you again for being there to follow my adventures. I promise I will try not to take so long before my next post and again, if you follow me and I do not follow you please let me know!
I wish you all the best and send you all a big hug
Giac


