
Hello everyone,
I hope you are all doing well. I am sorry if I have not been around the past 2 weeks. Jo and I had vacation time and we booked a last minute trip. We just got back from a wonderful cruise to Bermuda. We had amazing weather and very smooth waters...thank goodness.
I loved the trip but was excited to come home because the day we left I finally finished the kitchen renovation.

Here are some picture of the original kitchen.

My main complaint was that there was not enough cooking surfaces for a house the size of the manor. When you think of the family of 6, the banquet hall for 20 and the number of staff to cook for, I don't care how great a cook was in the kitchen it just would not work. I tried adding wall ovens on the back wall....

...but the Bodo Henning range, while beautiful, was just too small. Also, some of the built-ins I made were a bit chunky...things like shelves being too thick...it bothered me. So without further ado, I present to you...
The Kitchen
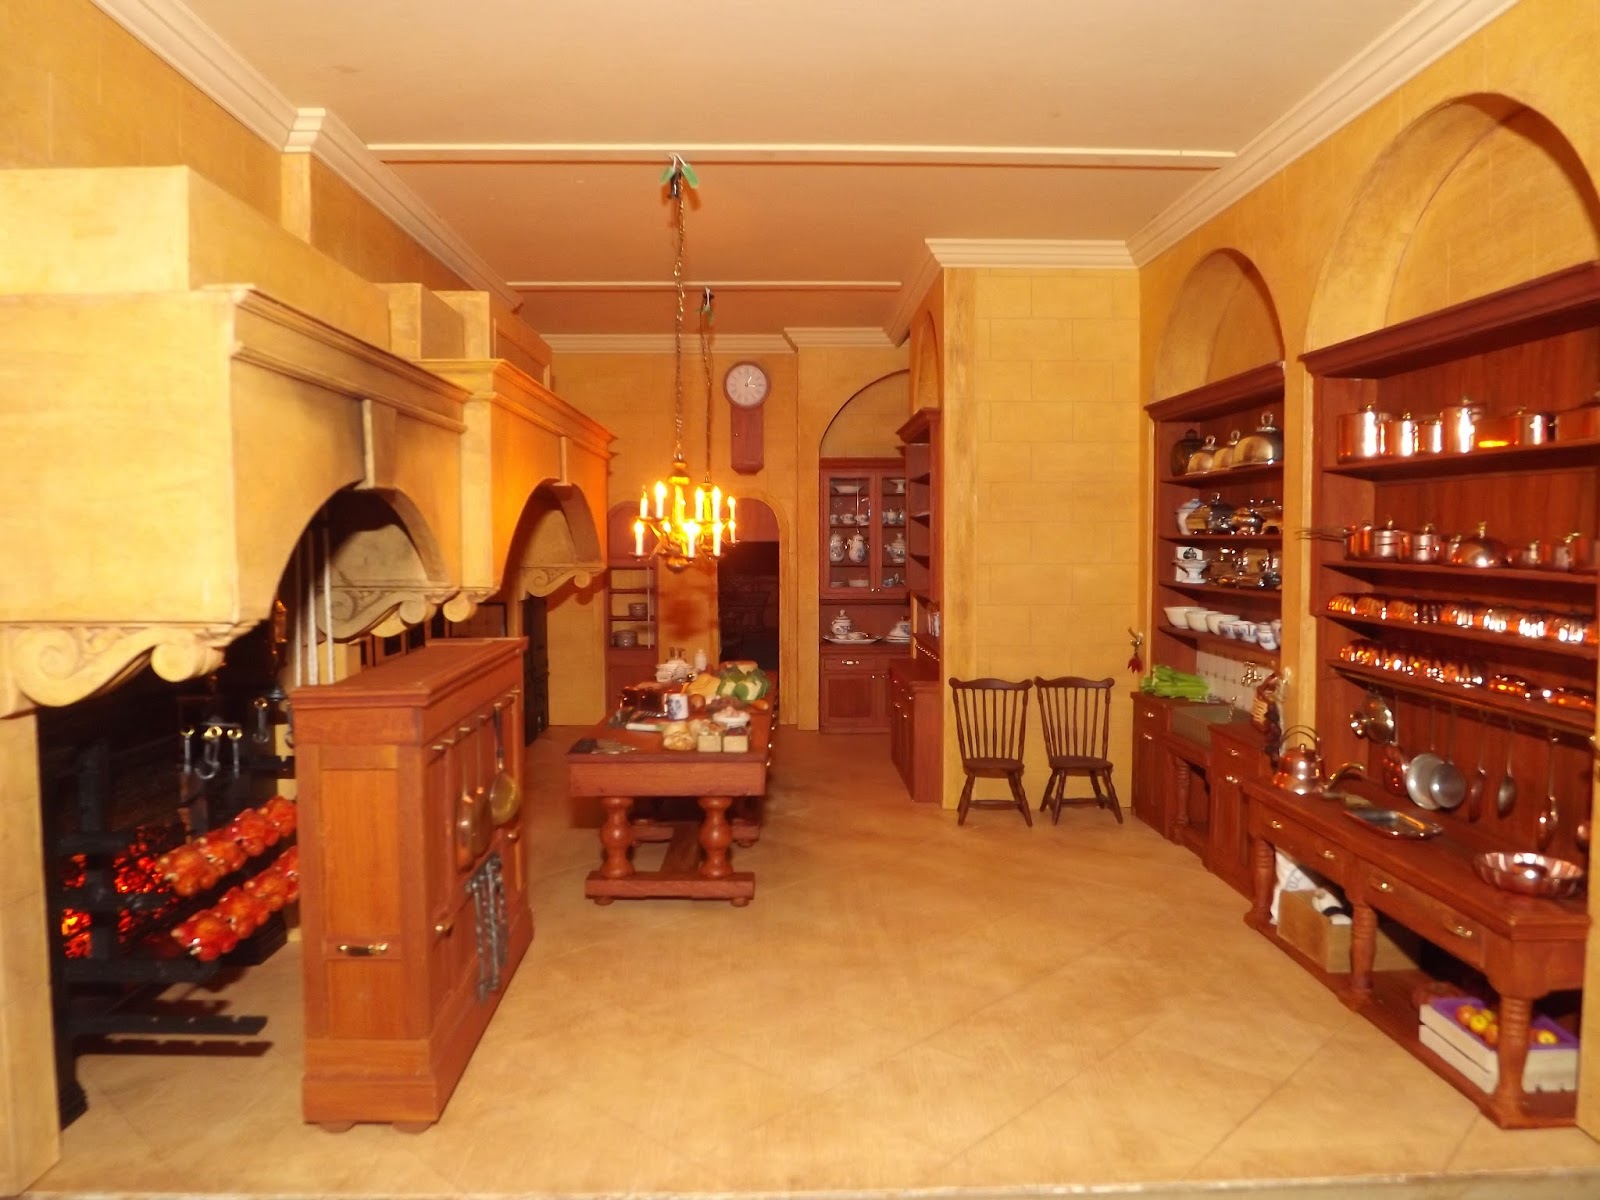


The new kitchen design was inspired by the old kitchen at Chatsworth house.

Today it is used as a wood working shop (that sound is my heart breaking). I especially loved the chimneys and based my design around them. A long while back I posted some dry run pictures of the kitchen...

...I played around with the foamcore chimneys and after several floorplans I decided I would rather have all the cooking ranges on one side. The rest of the kitchen just fell into place.
The Chimney wall
The east wall of the kitchen consists of 3 stone chimneys.

The one on the left is the roasting range for spit cooking meat. The middle one houses a 13 inch cooking range which has 2 fire boxes, and the right chimney is for 2 large wall ovens. The chimneys are made with double ply illustration board and leftover lumber for support and solidity. The brackets are from Sue Cook.

The cooking range and roasting range chimneys arches were made by slowly bending a strip of 2 ply illustration board with wood blocks to hold the strip in place at the right angle. The picture above is the 13 inch one.

I added a back to the arch structure and then angle pieces so it would look more realistic when seen from underneath. The oven chimney had a smaller arch which did not protrude as much into the room, so I made it by gluing together 3 layers of the illustration board. that made is very solid and not too thick.

When the chimneys were built, I added basewood strips and molding to dress up the front.

Finally, I covered the entire structure with 3 coats of gesso.

I made the faux stone finish with Americana and Delta Ceramcoat paints. I sponged on a coat of light buttermilk, then a coat of sand paint. I then dipped my brush in antique gold paint, dipped it in water, then went over the entire surface...kind of a really intense yellow wash. I wiped it off with paper towels and let it dry overnight. I then went over it with a wash of 90% water and 10% dark brown paint. When that was dry I took a stylus and a metal ruler, and made the 2 x 1 inch stones. You will see it better in pictures to come. Next step, the cooking.
Roasting range, cooking range and wall ovens
The wall ovens are very simple.

I took double illustration board and cut out the oven section and added some clock hands I purchased at Micheals and some knobs and molding. I glued everything on with The Ultimate glue then painted over it with Rust-Oleum spray paint which is used for patio furniture.

The cooking range, as well as the ovens, were inspired by the kitchen at Audley End house. Again I started with illustration board, molding and clock hands...

... and then I made the fire boxes to hold the coal .

I really am not sure exactly how everything worked. I just copied what I see and this was the result.

At this point the fireboxes and range were painted with the spray paint separately. I only assembled them after the coal was glued in place. I also built the back wall of the range using 1/16 x 1/16 molding and laminated wall tiles. I spray painted the "Iron" part before installing the tile inserts. In the next picture you also see the doors to the flues which are made of basewood and leftover handles.

When all was dry and the colas inserted, I glued it all into the chimney.

The roasting range was a bit more of a challenge. It is basically a giant grate. I based it on the one at the Royal Pavilion, one of the favorite buildings I've visited. I started by making the arms to hold the spits out of 1/8 x 1/4 inch basewood strips.

I then cut out an illustration board back (2 ply) and glued on some 1 inch lumber to make the sides. Prior to assembly I drilled holes where the barres that hold the coal will go.

I then added molding on the base of the side supports and inserted the brass rods.

Here is the finished piece before painting...

...and after painting. Each range and the ovens took about 6 coats of spray paint to be completely covered, and then 2 coats of varnish to protect the finish.

With the roasting range done I got to work on the spit mechanism, again inspired by the one at the Royal Pavilion. I started by gluing beads and a gear to a brass rod. I made 3 u-shaped brackets out of 1-16 basewood and painted it all black.

I glued it into place and voila!

The rope goes between the beads and are attached to each spit. It does not work, but I tried to make the gears and the mechanism look as real as possible. In real life, the smoke would make a turbine built into the chimney turn and the gears would make the spits turn.
The last step was to dirty the roasting range. I used my utility knife and a stick of charcoal to make powder, then applied it with an old brush.

Earlier on I mentioned the coals I needed to install. This was tricky because I could not find anything that worked with the sizes of my ranges. I saw some bloggers using tic tac containers and cutting them to the right height, but the roasting range was so large that the square box looked horrible and fake. I finally thought ofcutting out the sides of the orange tic-tac box and I held the plastic over a tea candle until it just got soft. I then put it onto a piece of crumpled up aluminum foil to create the texture of coal.

In the picture you can see I used another piece of foil to help push the soft plastic into the aluminum foil to create the texture...do NOT use your fingers...I found out the hard way. Also I recommend doing this outside. The smell of the plastic melting could not have been good for me. When the plastic was cold I used a tip from the great Elizabeth from studioeminiatures and dabbed the plastic with black glass paint which is used to imitate lead. I glued them into place and light them from behind with grain of wheat bulbs and voila! The chickens are roasting nicely on the spit, and you can see 2 bottle jacks for roasting smaller cuts of meat from Sussex crafts.

I still might dirty up the other chimneys, but I am happy with the results. I finally have enough cooking surface ;)

Built ins

I created arches from the illustration board the same way I made the chimneys. The floor is just painted single ply illustration board done the same way as the walls, but with a 50/50 dark brown wash and a square pattern.

The built ins were made using the 2 ply illustration board and more leftover lumber. My goal was to use up what I had and not order anymore wood. It involved a lot of thinking, but mission accomplished! I wanted the doors flush with the units, so I took single ply illustration board and cut out the doors and drawers. After painting I glued everything back onto the unit.

In the next picture you can see every piece for the 4 units. I assembled some but kept shelves, drawers and other pieces separate so it would be easier to paint the wood grain.

Of course I had several dry runs to make sure everything works as I had planned.

After the sections were painted, I glued them into the arches. In the past I have used 1/8 inch wide strips and dug grooves into them to hold the shelves. This time around I realised I was out of 1/8 so I used 1/16 instead because I had a lot of it lying around. I cut one piece to the height of the unit, then cut pieces to act as spacers between the shelves. When the units were built I covered the edge with thin molding to cover the construction.

Pot rack
The first arch houses the pot rack. It was important to me that I display my copper pot collection properly. After I decided on the shelves and their measurements, I needed to find a way to hang the pans. I decided, rather then hooks which would be limiting, to drill holes through 2 small pieces of faux finished lumber and attach 2 brass rods.

I then glued it underneath the bottom shelf. I purchase me copper pots and pans from Jason and Jacqueline Getzan and they always supply hooks with each piece. This way I have 2 rows to accommodate anything that needs hanging.
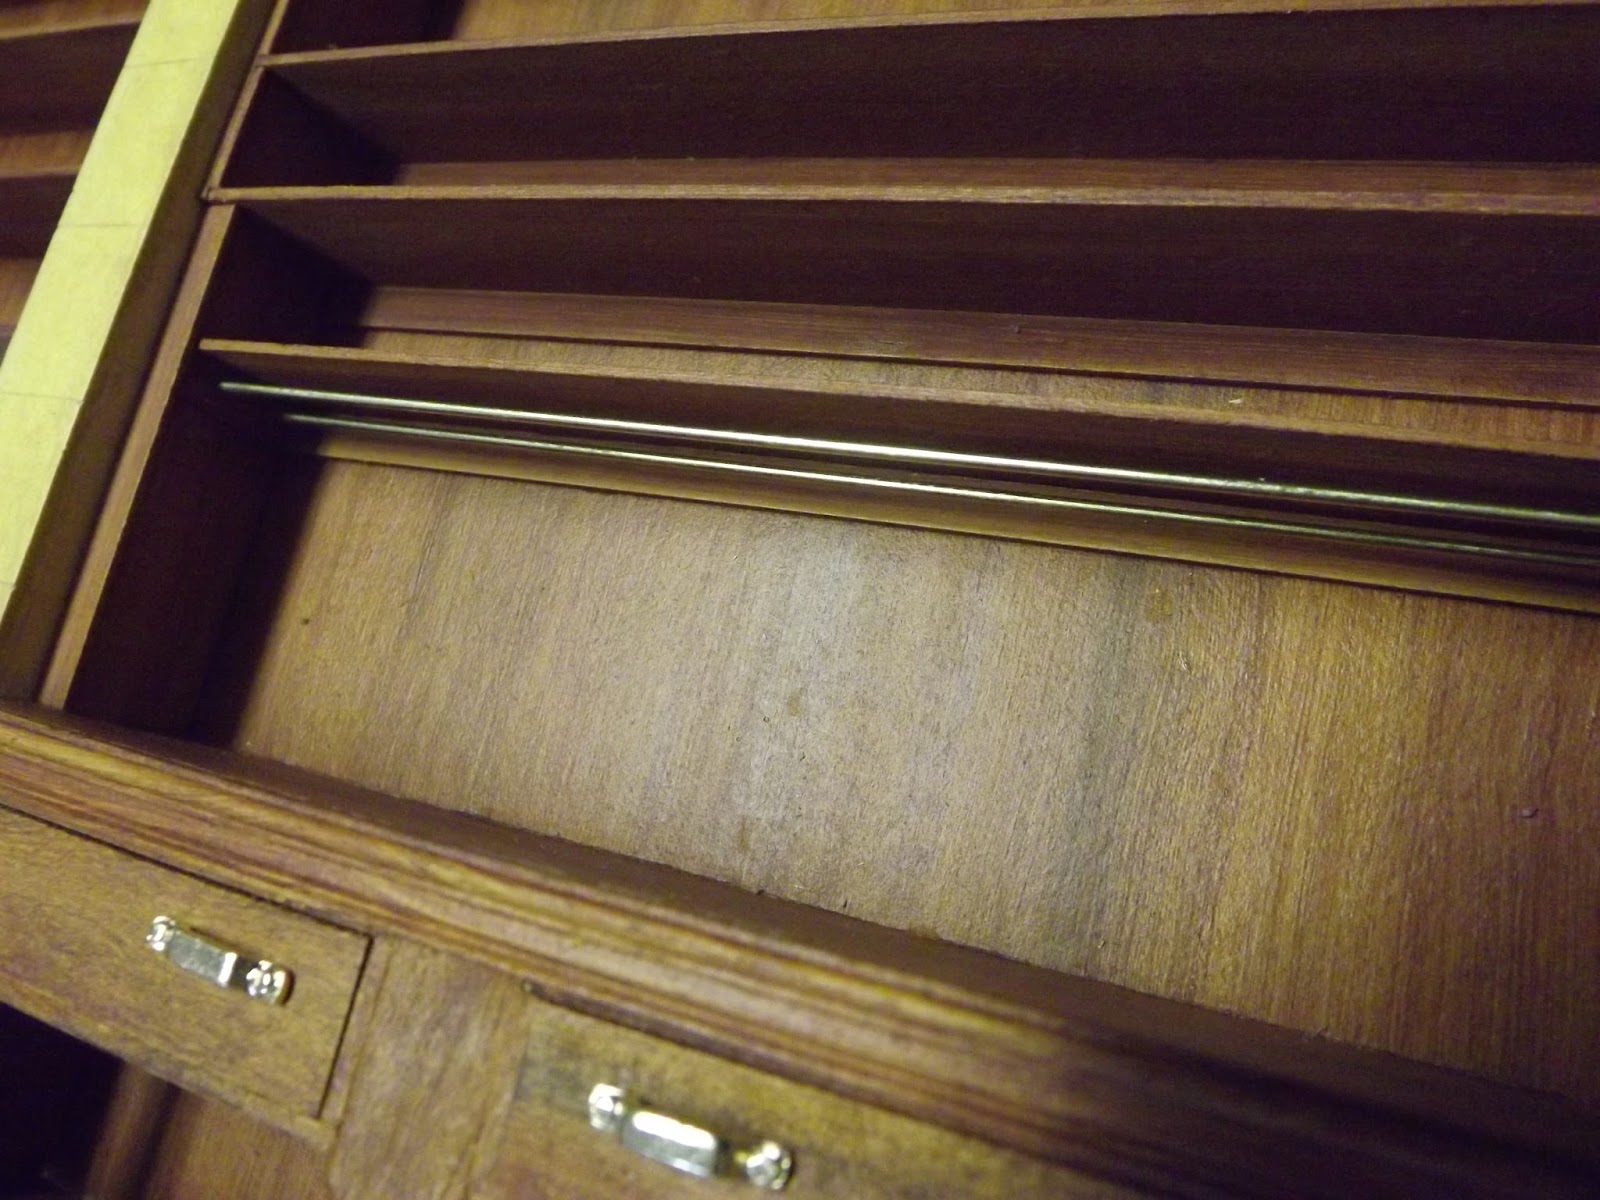
The bottom part of the pot rack has the only 2 working drawers in the kitchen. The rest are fake as are all the cupboard doors. The base of the unit was made with 3 leftover newel posts.

Sink
The sink was also purchased from Sussex Crafts as were all the handles for the kitchen. Once again I used leftover newel posts for the sink base and drilled holes for the plumbing. I used the same laminated cardboard tile for the backsplash that I used for the cooking range.

The sink is a gamekeeper's sink. It would be used to wash and rince off some food and fill pots and pans.

I loved the drying rack and the double sinks in the old kitchen, but I decided to have a much larger scullery in the basement of the manor instead of cramming it into the kitchen.
Butler's pantry
I was dissatisfied with the old butlers pantry. The shelves were made with lumber that was much to thick. It completely ruined the illusion for me, not to mention my wood grain was off because I pre assembled the unit before painting it.. This time around all the shelving in the kitchen was made using 1/16 inches. It made all the difference. Unlike the rest of the storage units which were all glued onto a back piece stuck to the wall, the top of the butler's pantry was made by building the front first.

This enabled me to make a removable section so I could install my china outside of the manor then slide it in place. I try to not make opening doors because they always seem to come undone or get pulled out by visitors. The unit was really snug in the arch so I did not have to come up with a system to hold it in place like the last time. I just built a shelf for the unit to sit on.

The last unit for food storage was made the same way. The spice drawer doors are just a 1/16 inch piece of lumber I cut up, painted and glued on. I really wanted to order StokesayWares Victorian kitchen jars and actually spaced the shelves to accommodate them, but that will have to wait. I worked on plans for the banquet hall on our trip and it will cost me a pretty penny. Maybe one day I'll have my jars, but if not, the kitchen still looks pretty good.

The Ceiling
The top of the room was damaged when I ripped out the old chimney and column of the old kitchen, so I just painted a piece of double thick illustration board with the Light Buttermilk color I used as the first coat of the faux stone finish. I cut a groove into it for the wires to sit in. After it was glued in I installed the crown molding and I took 2 wood strips, painted them to match and drilled a whole for the light fixture. This covered the chanel for the wire.

It adds a bit of architectural interest to the room, but still keeps is simple as most kitchens were.

Dumb Waiter
With the scullery in the basement and the banquet hall on the top floor, I needed a way to get food and things up and down easily. I found a picture of a dumb waiter I liked online and built one of my own. The unit is a box with shelves. I covered the front of it with vertical wood strips to act as spacers. The front of the waiter is 2 layers of illustration board that finish flush with the stone walls, and then I built an arch which matched the doorway to cover the gap.

The spacer permitted me to install the rope which would have been pulled up or down to make the waiter climb or descend. The back of it was painted like stone. I saw a lot of dumb waiters with closed doors, but I thought this one would be perfect for the kitchen.

Clock
I wanted a clock with a large face so the cook could keep an eye on things. This one is a simple box I made, 3/8 inches deep, with a circle I cut for the face. I found the clock face online, printed it, glued it on and varnished it. The handles were in the same pack I used for the hinges on the ranges and ovens. I think the fact that they are not painted or printed on makes a big difference.

I put all these pieces together and the kitchen walls were complete.

The table
One of my biggest challenges has been to find big furniture for the manor. Most miniature furniture is made with small kit rooms in mind. I knew from the start I wanted a large table for several people to work on. I had some turned wood pieced I purchased on a past trip. I decided to use them as feet as they were just the right height. I cut out 4 sets of wood strips and drilled holes to accommodate the wood pieces.

Drilling a large hole in the wood caused it to split. I used painters tape to tightly wrap each piece and that kept it from splitting. I then glued on the turned wood pieces, connected the leg units with lumber strips, and built a box out of wood and illustration board for the drawer section.

The drawers are simply pieces glued on the sides of the table. I used leftover strips as spacer so all the drawers would align properly. The top of the table are 1/8 x 1/2 inch strips I glued on. When I mention wood strips, I always refer to basewood. I added handles to the drawers and my 13 inch by 3 1/2 inch table was done.

Victorians used massive wardrobe like screens in front of the roasting range. The exterior was made of wood that protected the cooks and the interior was lined with tin that reflected the heat onto the meat. It was mounted on wheels and could be moved around the kitchen. My version was inspired by the one an Penrhyn castle. I added on some hooks for pans that were too long to fit in the pot rack, and the fire tool set.

The inside needs to be painted to look like tin, but I figured you have waited long enough for a post. Often time the interiors had shelves to keep plates warm.

And finally the kitchen adventure comes to an end. I still need to make a drip pan for the roasting range, and I want to build a bain marie to fill some of the empty space at the front of the room, but I think I have enough of the kitchen for the moment. Here are a few more pictures for you to enjoy.


I know many of you loved the old kitchen, in fact many family membered voiced their criticism when I ripped out the old one, but I think the new kitchen is far more realistic in terms of function and the stone walls and dark wood are more dramatic and fit in the manner much better. Never let anyone or anything, especially fear, keep you from redoing something until it is just right.
In my last post, I was asked what music I listen to when I work. I usually have dvds about English Country Houses or the last season of Downton Abbey on while I work, but the last few time I had music on is was usually Madonna's last 2 albums or Tchaikovsky's Sleeping Beauty.
Also, I would like to thank Feedspot for selecting my blog as one of the Top 100 Miniature Blogs on the web. It is a great honor and I appreciate it very much.
Next time I will either present the countess' study or the ballroom. I wish you all the best, and as always thank you for following me on this most likely never ending journey.
Big hug to all,
Giac
Bonjour Giac,
ReplyDeletecette nouvelle cuisine est, comme vous dites, bien plus réaliste que la première vu la grandeur de votre manoir et le nombre de personnes qui y vivent (et y mangent ;-)
Je suis en admiration devant votre soucis du détail, encore plus dans cette pièce fonctionnelle. Votre tallent semble sans limite, autant dans la décoration des appartements privés que dans les pièces "de services" BRAVO!
Every time you post about this house I spend hours reading and looking at your pictures! I love the redo, it looks so much more in keeping with the rest of the house.
ReplyDeleteI love all of it but I think my favorite is your table. Those gorgeous turned legs and the drawers. Just beautiful.
Glad you had a good time on your trip! Hope it was inspirational.
Not many miniaturists truly make me speechless or have the ability to REALLY make my jaw drop. I actually noticed my mouth was open while I scrolled through these photos! ;-) You have done it with this magnificent project. It is just fantastic Giac. I am totally in awe of your design and building skills. It is a beautiful room!!! Congratulations!!!!!!!!!!!!!!!
ReplyDeleteGiac, todo lo haces a lo grande. Esa cocina es impresionante, cada cosa, cada detalle, una auténtica maravilla. Un beso
ReplyDeleteHi Giac! Nice to hear you've enjoyed your last cruise together with Jo!
ReplyDeleteI really think you have magical hands, you can achieve everything what your eyes see and your hands can convert it all into miniature. I fully agree with Catherine (see the above comment) I have admired everything I've seen on your pictures. I almost could feel the atmosphere in this kitchen as if I was in there, the results are stunning and amazingly realistic! Yes, I was also one of those bloggers who thought it was such a pity that you teared up the elder kitchen, but now I see you were right: this complete makeover is splendid and it makes the kitchen even more fantastic!
Hugs, Ilona
Dear Giac,
ReplyDeleteSpectacukar is the first word that comes to my mind. It is truly spectcular! The old kitchen was a fine Victorian kitchen. This however is a proper kitchen for a grand manor like the one you are building! Truly excuisite. What really sets your rooms apart from many of the miniature rooms out there is the proper scale you give them. It was a joy reading up on your exploits again.
I hope that I will achieve a similar level of realism and Wow-factor in my miniature coutry seat.
Your fan,
Huibrecht
La cocina antigua era preciosa y esta nueva es alucinante. Da sensación de amplitud. Diseñada para trabajar a lo grande. Muy bonita la mesa.
ReplyDeleteolá querido amigo Giac:
ReplyDeleteseu trabalho tem algo de divino !!
é maravilhoso e a fico confusa às vezes se é tamanho real ou uma miniatura.
pensei que fosse sua cozinha a princípio...
é um trabalho de artista, alguém que tem a alma sensível !!
parabéns por tudo que é capaz de fazer e que Deus sempre te proteja e te guie !!
grande abraço e uma feliz semana abençoada.
:o)
Hi Giac,
ReplyDeleteFijn te lezen dat jullie van een mooie vakantie hebben genoten maar altijd heerlijk om weer thuis te komen. Wat een ongelooflijk mooie metamorfose heb je weer tot stand gebracht. En je hebt helemaal gelijk, als er iets is waar je toch niet tevreden over bent is het beste om door te gaan tot het 1000 % naar je zin is.
De vernieuwde keuken is werkelijk schitterend geworden, en ik vind het erg leuk dat je op een paar foto's je handen erbij ziet, zo knap om alles op zo'n kleine schaal te kunnen maken. De foto's en uitleg zijn heel fijn om te bekijken en te lezen, en in deze vernieuwde keuken mag je wel een heerlijk diner voor me koken, haha het is echt PRACHTIG.
Wens je een mooie nieuwe week toe.....
Lieve groetjes,
Josephine
Hello Giac, what another amazing makeover. I love it! You never cease to amaze me with your talent. This room is just perfect and the work you have put into it is mind-blowing! I'm so glad that you and Jo had a wonderful holiday. You are just right! Looking forward to more from Dewell Manor!
ReplyDeleteAll the best
Vivian
Wow Giac, there is so much work there in that kitchen! But good on you for taking the plunge and renovating. I agree that the new kitchen suits the manor much better. And it is YOUR kitchen, not your family's, so make it how you want it and you will be happy. Xx
ReplyDeleteIt's stunning Giac! You've done an amazing job. This kitchen is befitting a manor. I cannot wait to see the next room.
ReplyDeleteHi Giac!
ReplyDeleteI love seeing all your changes, the kitchen is looking really great and suits the manor. It's not always easy making the decision to pull previous work apart to begin again, so I admire your dedication to attaining perfection.
Congratulations to reaching the top 100 Miniature Blogs...well done!
Big hugs,
X
The new kitchen is nothing short of spectacular and very fitting for this house. This is a great post explaining each of your decisions and how you accomplished each piece. Great photos too. The dumb waiter was a great touch! Looking forward to your next post.
ReplyDeleteHi Giac!
ReplyDeleteThe kitchen looks gorgeous, great details <3
Hugs Lea
ho !!!! le changement est incroyable et parfaitement réussi .
ReplyDeletec'est difficile de reconnaitre l 'espace de l 'ancienne cuisine . vous avez fait un travail étonnant sur les volumes . vous avez créer énormément de choses. la cuisine est magnifique . merci d 'avoir partagé avec nous toutes les transformations . on apprend beaucoup en regardant vos photos . le résultat vaut toutes les heures de travail . j 'aime l 'harmonie des couleurs entre les murs , le sol et le plafond . la cuisine parait plus grande .
Oh my gosh!!
ReplyDeleteWhat a wonderful kitchen. In such a kitchen to cook, would be my dream.
Great, great job.
LG Alexandra
Hi Giac
ReplyDeleteWhat a wonderful house you are making. I look at my own houses and is satisfied untill I see yours. Then mine is a mess. Wish I was as clever as you are.
The new kitchen is wonderful, so much more space and it is also more adequate for your kind of house. I love the 2 cooking areas, great fireplace.
ReplyDeleteGeneviève
Une vraie cuisine de château! Je l'adore.
ReplyDeleteA bientôt,
Vincent
Giac,impresionante,es de un realismo absoluto,me encantan todos y cada uno de sus rincones,de sus detalles,sería mi cocina ideal.Que gran trabajo,no dejas de sorprendernos!!!!
ReplyDeleteDesde luego,el estilo de la cocina,es mucho más adecuado a la casa.
Besos.
Excellent job in the new kitchen, and thank you, that you shared fine storys and all the fotographs from all phases. Congratulation nomination, to your blog. (Sorry my bad english).
ReplyDeleteUtterly FAN TAS TIC! It sounds inadequate to say that I LOVE it but I DO! Every inch and then some. I love some of your clever conversions as well i.e. the clock hands for the stove hinges- Brilliant, but the multi spits and the room arrangement and the stone, the cupboards, the DETAILS.... are beyond adjectives;in short Giac- your new kitchen ROCKS! ♡♡♡
ReplyDeleteelizabeth
Hi Giac, it's incredible. You might think it is a real kitchen ... fantastic !!
ReplyDeleteI can watch your pictures for hours. Again and again I see new details. The kitchen is a dream !!!! Your whole house is a dream!
Big hugs
Sigrid
La excelencia de tu trabajo me deja sin palabras, Giac! Es una belleza! Cuando he visto que desechabas la antigua cocina casi rompo a llorar... viendo cómo ha quedado ahora creo que voy a llorar de emoción!!! Jaaaa! Te admiro! :)
ReplyDeleteWOW! Words fail. Your work is nothing short of genius. And I love the use of your word "simple" in relation to the wall ovens, etc. Might be simple for you but way beyond the reach of some of us who dabble with miniatures. You are an inspiration!
ReplyDeleteRegards, Linda
Well that's nice and spacious! And fitting the manor. You stayed true to the original inspiration. Very well done!
ReplyDeleteBonjour Giac,
ReplyDeleteQuel FANTASTIQUE travail ! Cette cuisine paraît tellement réelle. C'est une pièce spacieuse, parfaitement agencée ...
Que d'ingéniosité déployée là encore.
Félicitations !
Amicalement. joce
Did I ever mention before that you never stop to amaze me??? ;O) Whenever you're building a room it is awesome and so was the old kitchen... if you'd asked me before I would also have joined the choir saying "What a pity..." But you were right - the old kitchen was not realistic and too small and limited for such a big household. Your makeover was worth any effort, time and burnt fingers (btw - this tictac coal idea is genius). Your new kitchen is fascinating in every way with so many details to discover. And it's always great to see how you're achieving these results that look so realistic in the end that nobody not knowing the background of these pictures would ever suppose it's a miniature room. I'm looking forward to learn what a bain marie is and I've already learned the meaning of a dumb waiter, it's always great to hear new expressions in English. But now I have a problem... your roasted chickens looks so yummy! *LOL*
ReplyDeleteHugs
Birgit
Hola Giac, Me quedo maravillada con tu trabajo. Si bien es cierto la cocina anterior ya era perfecta, la nueva te quedo simplemente "Magnifica".
ReplyDeleteSaludos.
Hi Giac. I have thoroughly enjoyed this post and every step of the way in your creating of this kitchen. Your imagination and ideas are inspirational, and your attention to detail is remarkable. The result looks both authentic and realistic. Do you mind me asking what "spray paint" you used on your range and fireboxes? Is it acrylic or oil based, or some other paint? Thanks again for this wonderful post. Celia
ReplyDeleteGiac, your work is awesome! Have I said it before? The attention to detail and your craftiness to produce so many beautiful pieces and recreate the perfect atmosphere are just beyond words. Your kitchen is MARVELLOUS.
ReplyDeleteDear Giac, I am absolutely awestruck with this new kitchen!!!! Again and again I have had to look twice or three times to be sure the picture is of miniatures and not the real thing! You have transformed the place from a Victorian Estate to a Grand Palatial Manor suitable for Royalty to visit! (I assume the banquet hall will be busy with all the Lordly guests!) I just can't believe this is in the same house as the first kitchen! There is such grandeur in every piece you built..... but those chimneys with those ovens and the huge cooking surface.... WOW WOW WOW!!! They really set the tone.... serious cooking gets done here! And watching the work you have done on the other parts of the house recently, I can see how much this new kitchen was needed... Now it really is equal to the grandeur of the improved bedrooms and library and halls! This Manor just keeps getting more and more impressive! I LOVE it!!!
ReplyDeleteHey buddy
ReplyDeleteYour renovated kitchen looks incredible! Every room that you have gone back to has looked more like a RL room than the last! I learn so much from your pictures and how you describe how you built everything - the ovens are so great and all the new display cabinets and counters make the whole room look like it's capable of catering en masse. It also has a historical appearance which suits the Manor well (Chatsworth is my favourite place in the world and you have caught the essence of it just perfectly).
I can't wait to see more...
Best as always
Si x
Hello, Giac - Yes, I loved the old kitchen, but now that I see the new one, I know that of course you were right to rework the space to create a working kitchen befitting the size of the manor. The new space is overwhelmingly beautiful and functional. You've done a wonderful job on the chimneys, ovens, and built-in storage units. I'm in awe of the complexity of all your designs, from the floor to the ceilings - including that huge and perfect table. This kitchen is an outstanding accomplishment. Congratulations!
ReplyDeleteMarjorie
Hi Giac, Wow you have been super busy and the new kitchen is magnificent. I love all the details you have added...so many wonderful items to look at.
ReplyDeleteDear Giac,
ReplyDeleteWonderful! The new kitchen is amazing and love everything about it.
Every little detail is great and love seeing how you did the work. Congratulations for the top 100 and can see why.
Great that you and Jo had a lovely vacation.
Enjoy the rest of the weekend
Hugs
Carolyn
WOW your kitchen looks amazing Giac, brilliant work.
ReplyDeleteWow, wow, wow, wow! I love the improvements and only you can improve on something that is already spactacular! It is impossible to look at the photos and not get lost in admiring every detail. You are so smart at figuring how to make small things function and look so amazingly REAL! Even the feeling in the kitchen is wonderful, and I will never know how you make that magic happen! Awesome, Giac!
ReplyDeleteHello, Giac! Welcome back! With every change, everything is better and better! This is really a grand kitchen for a large mansion. Sometimes it's quite difficult to switch thinking to such large volumes of space, but you did it and it's fine. Hugs, Julia
ReplyDeleteOOOOO 00000 ooooo how beautiful so real...incredible...
ReplyDeleteWhat a great blogpost you teach us to step up to go beyond the limits, you're inspirational!
Have a nice day,
groetjes van Marijke
Hello Giac. Over the past week I've been looking and looking at all your wonderful pictures thinking I might, just might, be able to come up with something that the others haven't already said...but I can't! While your first kitchen was truly a lovely piece, this one is just the best. I love it - all of it! You're clearly going to have to keep extending Dewell Manor so we always have something to enjoy!
ReplyDeleteCongratulations on your award - very well deserved.
The kitchen is perfect! I love it :-). I didn't know about the cupboards that held plates warm,that's so interesting! You've thought of everything necessary for a Manor's kitchen. Truly an amazing job, your dollhouse is fantastic :-). x
ReplyDeleteBeautiful.
ReplyDeleteWell, this is just utterly gorgeous. You have managed to complete a fantastic kitchen here. You have thought of every single last detail and then executed them with precision. Your range and spit are absolutely amazing. And I love the brass bars you added to your pot rack. A lovely way to display your gorgeous pot collection. I could pour over these photos for hours! Well done!
ReplyDeleteLe personnel de cuisine vous remercie Giac, il va se sentir très à l'aise lors de la préparation des repas pour les réceptions à venir . D'autant que la maisonnée doit recevoir beaucoup en cette saison d'Automne !! La cuisine est donc fin prête et très fonctionnelle !
ReplyDeleteWow, Giac, what a great and famous work, it´s soo lovely, wonderful and gorgeous, it´s perfect!
ReplyDeleteBig hugs
Uschi
I want to cook in this kitchen, and I don't even like to cook in real life!!!
ReplyDeleteWell done on your kitchen revamp Giac!
ReplyDeleteI love it ^_^ The details are fabulous as always.
xx
Well done on your kitchen revamp Giac!
ReplyDeleteI love it ^_^ The details are fabulous as always.
xx
Oh. My. Heaven!!!!!!! It's absolutely incredible, Giac! I am always in awe of what you do! Breath-taking!
ReplyDeleteLori K.
You are a gifted crafstman. Your renovation realy made the kitchen suiteble for the whole household.
ReplyDeleteYou make it look so simple! I can imagine that the roasting range was very difficult to make, but you really think of everything. I hop you enjoy miniature making for a long time, so I can keep following your beautifull work.
Big hug, Mieke
Kitchen is absolutely amazing.You are so so talented !!!
ReplyDeleteI always learn so much from your posts. The kitchen is gorgeous. Thank you so much for sharing your amazing skills with us!!
ReplyDeleteMio caro amico Giac passo a vedere sempre i tuoi capolavori. Un abbraccio
ReplyDeleteWow!!!! Amazing renovation of kitchen. Great post & detailing is super awesome. Thanks for sharing.
ReplyDeleteI am your new follower, hope to see you on my blog.
https://clickbystyle.blogspot.in/
Beautiful old-fashioned kitchen I am always amazed at your work!
ReplyDeleteOla meu amigo ,nao me canso de dizer que seu trabalho é maravilhoso perfeito.Feliz halloween para voce.
ReplyDeleteGreat project. I am very impressed with the details.
ReplyDeleteI invite you to me.
Regards.
Hi Giac, thank you so much for your appreciation , it matter me a lot. Keep in touch.
ReplyDeleteWow, it is really a MASTERWORK
ReplyDeleteMy GF is into diorama/dollhouses etc. but this is whole new level of skill (I build plastic model kits but I am thinking about wood working too).
If you can, could you visit my and my GF's blog
http://fejwsi.blogspot.com/
it is mostly Polish (with bit of German and English).
P.S. Do you have any LED light guides to use in dioramas?
Thank you
Krzysztof
Hello Krzysztof,
DeleteThank you for your lovely comment. I am afraid I have not used LED lights and have no information to give you. They look too modern for the timeline of my miniature house. I found this link and perhaps it can be useful to you: https://true2scale.com/led-lighting-tutorial/. I hope it helps.
Big hug
Giac
Thank you for your answear, that link have good and easy tutorial that can help me a lot (I build mostly Bandai Gunpla and Tamiya Mini4wd model kits, and smaller dioramas)
DeleteI am really happy to find person with that great taste and skill in minature making, I will read all your new posts and aspire to be at least half as good as you
Also my Girlfriend when first saw your work was thinking that those were photographies of REAL Villa not a minature.
Thank you
Krzysztof
P.S. Will it be a problem if I send link to your blog to my friends?
Hello Krzysztof,
ReplyDeleteI am glad the link helped. Of course you can share me blog with your friends. I started blogging to share what I know and learn and be inspired by others. Good luck on your models.
Big hug
Giac
Wooow! You made really great job! Well done. I am looking at this all and i am starting to feel: I am in love! Amazing little artworks.
ReplyDeleteVery late but no less sincere...Wow! What a transformation! Yes it is a shame to rip things out, but you always make it so much better. LOVE the ranges and the attention to detail with the gears inside the chimney. With all the wooden furniture I always have to remind myself it is actually painted illustration board. So convincing.
ReplyDeleteThe whole kitchen is a triumph and a wonderful addition to your Manor house.
I LOVE your new kitchen the attention to detail is incredible!
ReplyDeleteWho made the chickens?
Debby
Dear Giac, I cannot believe I missed this post in September. I have read and reread your descriptions and I am very grateful that you took time to detail your process so clearly.
ReplyDeleteThe old kitchen was great but the new kitchen is not only great but somehow “right”.
Wonderful details of the cupboard that they warmed plates that could be moved and loved the rope hanging in the dumb waiter. The kitchen table did need to be large/long and weighty. You have achieved it all using your imagination, skill and readily available materials.
Thank you.
All the best Janine
WOW! This is amazing Giac! You have outdone yourself again. Even down to the tiniest of details, like the subtle smoke stains over the fire. This kitchen seems so much grander and elegant; the other one was a tad heavier and darker.
ReplyDeleteJust came across your blog, and must say that I am flabbergasted by your work! Would love to keep seeing more, cheers!
ReplyDeleteHola Giac, siento haber estado tanto tiempo ausente en tu blog, pero estuve un tiempo de descanso y ahora me estoy poniendo al día. Tú cocina es perfecta, evocas a la perfección el clima que quieres crear, fantástica!
ReplyDeleteFantastic work! Tbh, I mourn for the original kitchen, kinda wishing you could have both kept it and made this one, too...why couldn't a big manor have two stunning kitchens?XD But this new one is a stunner for certain. Big hugs! Looking forward to seeing more rooms in all their splendour...
ReplyDeleteGiac, Your statement, "Never let anyone or anything, especially fear, keep you from redoing something until it is just right" was just what I needed to read as I go through this next chapter of my life. It applies to everything we do. The old kitchen looked great! But the new kitchen is so fantastic and functional. You put so much time and effort into projects to explain techniques you used is so wonderful. Congratulations on your Feedspot Top 100 Miniature Blogs selection.
ReplyDeleteYes, you are without a doubt one of the best of the best! Thank you for your inspiration. Thank you for your comment on my post.
One word Giac! Amazing!!! Oh, and a second word... beautiful!!!
ReplyDeleteHi Giac, I am catching up on the blogs after a very long hiatus, and I had to leave a note on this. Only a little late, but better late than never?
ReplyDeleteGiac, this new kitchen really captured me. It is exactly the kind of thing I love, with the history and the artistic elements of the room. You are truly talented.
While I did like the old kitchen, THIS kitchen is exactly what the manor needed. So wonderful to see your work...
OK, time to quite blubbering and move on to the next post...:)
Doug S