Dollhouse Blogs

Sunday, 23 September 2012

Nursery and Bathroom

Hello Everyone,
I hope you are all doing well. First of all, thank you SO MUCH for your incredible feedback on the Chinese tea room, I was blown away by your kind words and want you to know that I appreciate all of you, old friends and new, for taking the time to comment. Honestly, after that I was a little worried about how to follow up on that room. I hope I won't dissapoint!
Once again, I am sorry to have taken so long between posts. I wish I could post once a week, but between real life renovations and more complex miniature ideas, it takes me a little longer to finish a room. However, I did manage to get 2 rooms done the past few weeks.

I finished the Nursery

Nursery

Nursery

Day Nursery


Night Nursery
 And the Bathroom

Bathroom

Bathroom Fireplace and tub
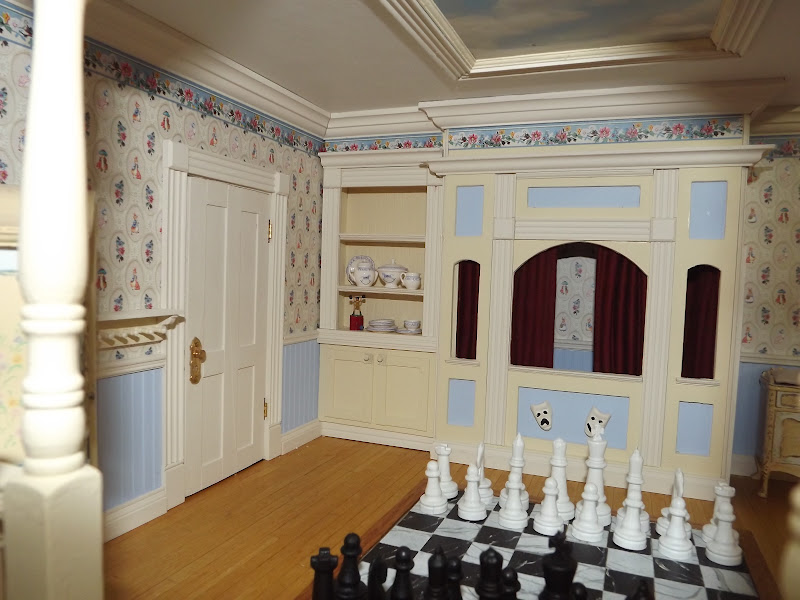
First of all, the Nursery. I had completely underestimated how long this room would take to build. The dimensions of the Nursery are 21" x 18". I decided to split it into a day and a night nursery. The night nursery is 18" x 8" and is a step up from the rest of the room. My starting point for the room was the puppet theater. After much trial and error I decided where it would look best and got to work.
Front of Theater and built in cabinet
 I started by cutting out each side of the theater in double thickness illustration board. I decided I would also build a built in shelf and cabinet to house my Nursery China and some toys. I used 1/2 inch lumber to frame each piece. You can see the "support" structure in the next picture,
Back of Theater and structural elements
 I had some wainscott panels I purchased and used some for the back of the open shelves. The doors on the bottom do not open, so I glued molding directly onto the illustration board and painted it.

Built in cabinet before painting
When all was dry I made red curtains using the pretty pleater. I glued them to the theater walls so they don't open. I'd rather they hang well and not lose their shape. I left an opening and will put a marionette bend over the stage. I had cut out a square in the subfloor and used leftover marble I painted on illustration board to make a chess floor. I wanted a chess set that the children could interact with...another idea inspired by Alice in Wonderland
Finished Theater and built in. I also made the coat rack to the left of the door using cocktail toothpicks
Before I installed the theater, I glued the wallpaper to the primed walls using regular wallpaper past. The paste workes great with Les chinoiseries wallpapers which are made of good thick paper, but I had a piece of blue non Les Chinoiseire dollhouse wallpaper I put onto the ceiling of the room and the paste showed.

Fixing a disaster
I didn't want to paint it, for fear of getting paint on the wallper on the walls, so I purchased a calender of coastal paintings and used it to create faux ceiling windows. I wanted them to look like paintings, not real windows, so I made sure the calender was of painting and not photographs. I glued them down over the ruined paper, then took illustration board and cut out the openings for the pictures, painted it my white ceiling color, and glued it down. A little molding and I was happy. I used a sunrise for the Night Nursery and a bright blue sky for the Day Nursery. You can see the finished ceiling in the first few pictures of this post.

The next step was the room devider. I glued down a piece of MDF to create the step up and then I made the floors for the room.

 I used lumber to cover the mdf. Every piece of molding or lumber in this room was painted before installation. I often had to do touch ups, but it is so much easier to have everything pre-painted...once I finally decided ont he color palette. I glued in the post at the back of the room and worked my way to the front.
 The railing sections were measured, built and painted before they went in. When I got to the end, I took a piece of mdf and cut it to match the angle of the roof line. I glued it in and added lumber to join the top of the room.
The final step was cutting arches in 1/8 inch basswood to fit between the centers of the posts. When all was dry I took out the pretty pleater and made some curtains. My idea was that the curtains would be closed at night so the heat of the fireplace would stay on the Night side of the Nursary and keep the children warm.

. 
View of Night Nursery from the Day Nursery
Another project I wanted was a roombox over the mantel. I love Alice in Wonderland and decided to re-create "Painting the Roses Red" I started by making a box out of lumber, then I used scraps of the calender I used on the ceiling to fill the box
The scenery
 I then used 1 inch lumber to make the castle wall and painted it grey. To create the hedge, I covered illustration board with suede fabric and painted it with green paint. The rose bushes are pieces I cut off from a sponge brush, inserted onto a toothpick, and painted.
Making the card gardners
 The "card" gardners are made from the thinnest lumber I could find, beads for the heads, and a piece of thin metal I had which I bent into the shape I wanted for the arms. I left one side of the metal longer on 2 cards to look like they are holding paint brushes. I painted on the clubs with a toothpick. The roses are very small beads that were flat on one side, but had a diamond texture ont he other. I painted them white, then went over with red paint to make it look like they were painted.

The finished roombox next to a penny


The roombox installed
Next to the fireplace I created a seating nook. I wanted a cushion for it, but the T shape made it difficult to upholster. After many trials and errors, I took a piece of foamcore board, cut out the shape, glued on some foam around the side, and covered just the side with my fabric. I cut illustration board for the top part of the cushion, covered it with foam, and glued ont he fabric. I used a needle and thread to tuft the cushion. I started on the bottom, pushed it through the cushion, then pushed it back through about 1/16 of an inch to the side. I took both threatds on the bottom and tied them tight. Next, I glued them together and installed them. The only part missing in the Nursery is a half scale table and chairs for a children's tea party. I might try making puppets that look like the Mad Hatter, March Hair (my favourite) and the Dormouse
The top part is on the left, you can see the tufting knots
 While all this was going on, I also worked on the bathroom when I had to wait for pieces to dry. I had the laminated cardboard tiles and mahogany bathroom fixtures from Bespaq. I had to paint 3 different colors of green on the walls before I found one I liked...you can see earlier attempts in the first picture.
I also had the Bespaq fireplace. I cut out the firebox and re-did it so it would be deeper and look more correct. Originally, I had planned to have only mahogany crown molding, chair rails,and baseboards. I glued on the floor tiles (a plastic sheet) and the wall tiles using wallpaper paste. There was a gap on each side of the fireplace wall caused by the piece of 1/4 inch mdf for the angled wall, so I used my doorframe molding to cover them. The top of the wall bothered me. The long strip of green made the room look odd, so I used the doorframe molding to create section and then also created some on each side of the bathtub
I had planned to remove the cistern and add a pipe to make it look more victorian, but through research I realised a one piece toilet was appropriate for 1900, so I decided to leave it intact and avoid making a mistake. At first I was worried the tile would not work for a victorian bathroom, but in the end I think it worked pretty well.

And now, as usual, here are the empty rooms


In the last post someone asked what kinf of china I would have in the Chinese Tea Room. The pieces on the corbels will be white with blue, green and red painting...I think, but for the table I did something I've never done before...I commissioned an artist to make me a dinner set. My very first commission!  I met Julie Dewar at the Montreal miniature Show and fell in love with both her and her work. I sent her a picture of a tea set I saw online and asked her to interpret it and create her own version of it. She painted a Cherry Blossom design on a yellow background. The pattern is so small I could not get a good picture, but you can at least see how amazing it looks int he room


Imperial cherry Blossom dinner set
You can see close ups of the set and more of her great work on her website at Westwinds miniatures. Julie, you are an amazing artist and I thank you from the bottom of my heart, I know they were a lot of work, but they are amazing and make me very happy!

And that, my dear friends, is all for now. Next, I will work on the office and staircase landing on the attic floor. I hope you all have a wonderful week, or weeks, and I look forward to catching up on your blogs. I have learnt so much by following all of you and I thank you for your kindness and your friendship. Keep up your amazing artwork

A big, big hug to all,
Giac

Sunday, 19 August 2012

Chinese Tea Room part II

Hello everyone,
I hope you all had a wonderfull weekend. First of all, thank you so very much for your great feedback. You are always so kind to me, and I really appreciate it very much. 
Today, I finished the Chinese Tea Room.


This room was inspired by the Chinese Lacquer room in Monplaisir Palace. During my research, I read a lot about exotic corners in wealthy Victorian homes and when my aunt Lorraine brought me back a wonderful book from her visit to the Peterhof, I knew the room would be just perfect for the small attic space.

Last post, I left off having just finished the chinoiserie panels and the main wall sections.

The ceiling was sent to me by a very dear friend. It is very Tudor, but after painting it white and accenting the plasterwork in gold, I think it worked out well. The next step was framing the chinoiserie panels with gold painted molding.

Normally, I start by looking at all the materials I have and design my rooms with that in mind so that I know exactly what I'm doing. This time, I started with a design and just jumped in. I was so happy with the look of the wall section that I completely forgot one little detail...rounded panels! I took my painted molding strips and used my Xacto knife to make cuts 3/4 of the way down, 1/8 of an inch apart. I then used gel super glue to carefully curve them into place. I wasted a lot of molding because it snapped a few times, but in the end it worked.
In the picture above, you can see I carved the edges of the top and bottom molding strips to line up with the design, then I applied 2 coats of Gesso to fill in the cuts. After some sanding, it didn't look too bad. The last preparation step was the corbels on the walls. I ordered brackets from Sue Cook and painted them gold. I used Delta Ceramcoat paints for this room because they dry fast. However, the metallic gold paint tends to be thick, and a skin forms on the top faster than on the other colors...it still went on well. After they were glued on the wall, I took a strip of lumber and cut it to create a small shelf over the bracket. Eventually each corbel will have a piece of oriental pottery on it. In the meantime, I used items from my collection to give you an idea of what it will look like.


The next step was the floor. Once again, I used iron-on wood strips from the hardware store, however I tried a new technique I plan on using in the Library. I started by drawing guidelines 1/4 of an inch apart on my illustration board subfloor. Next, I looked online and glued down 1/4 inch strips to create an oriental inspired pattern. I then mixed 2 parts black oil paint to 1 part Liquin. I covered my design using a small brush and wiped it off after 5 minutes. I waited 2 days for it to dry then filled in the rest of the floor.

I was happy with the result because the border was dark, but you could still see the wood grain come through. The only problem was that the paint was still a little wet in corners, so next time, just to be safe, I will wait 1 week before filling in the floor.

And here is the installed floor. Normally I use 2 or 3 coats of shellac, but this time I applied 4 coats to get a more golden color. When the floor and the 3 walls were glued down and had time to dry, I turned the attic section upside down and glued down the ceiling piece. I then cut illustration board to cover the angled sides of the room. I could have painted the mdf, but by covering it with illustration board, I hid the gap created by the thickness of the ceiling and the side walls.

Another idea I had was for the cabinet that will house a collection of teapots. It is the same principle as my butler's pantry.  
It would have been too tight to open hinged doors and reach inside the cabinet, so instead I made the cabinet a seperate unit that just slips into the hole in the wall. This way I can take it out, attach my teapots and tea caddies, then put it back in the wall with no risk of damage...much safer than working doors. The bottom strip you see in the picture is to enable me to eventually slide a piece of plexiglass for the cabinet doors.

The room measure 14 1/2 inches by 9 3/4 inches and is rather busy. For this reason, I decided the only furniture I will use is a table and 4 chairs, a tea trolly or small serving stand, and possibly a birdcage. I had an old walnut table lying around, so I took off the top, painted the base black and added gold detail, then faux marbled the top. At first, I was going to make it and the ledge beneath the fireplace white marble, but decided it would stick out too much in miniature. Therefore, the fireplace bottom is the wedgewood green color I used to make the chinoiserie, and for the tabletop I used black, forest green and white to create green marble. 3 coats of glaze and 1 coat of clear wax to finished the look.
And, as usual, here are pictures of the empty room.


Originally, I planned to hang gold curtains on the sides of the arched doorway. However, that doorway is the only view to the room behind it. For this reason I might just leave it open to get a good view of the large windows I cut out.

And that's it for the Chinese Tea Room. I won't lie, this room was a lot of work and a lot of patience, but I'm very happy with the result. My next step is to prime the rest of the attic section, and then I will work on the Nursery, Office, Bathroom, and the Parlor behind the Tea Room...then, I begin the exterior.

Once again, thank you so much for following my miniature adventures. I hate computers, but I must say it's a real priviledge to get to know all of you and your wonderful artwork. I look forward to reading your posts and I wish you all a wonderful week.

Big hugs,

Giac

Wednesday, 1 August 2012

Chinese Tea Room part 1: Illustration Board wall panels

Hello everyone,
I hope you're all doing well. I normally create a post when a room is finished, but since it's been a while since my last post I thought I'd just give you guys an update on the Room I'm currently working on.
I'm working on one of the rooms in the attic at the front of the house. Originally this was going to be a walnut panelled office, then library, finally I decided it will be a Chinese tea Room the Dewell's use to entertain prominent guests.


In this post I'll just talk about the construction of the panels which I made using illustration board. I've been asked by friends accross the sea exactly what illustration board is. It's basically thin layers of cardboard stuck together. I took one piece and seperated the corner to better explain.

I get my illustration board from my local art supply store
After I made the plans for the room I cut out each wall section in the illustration board. It warps when you paint it so you have to back it with something sturdy. Many miniaturists use lumber, but since I live in Montreal and order all my miniature lumber from "Manchester Dollhouse and Woodworks" in the States, I use it cautiously so as not to run out of building materials...I found Balsa here in Montreal, but there are no words to say how much I hate working with wood that soft. Since I have many small pieces of mdf leftover from building the Manor structure, I just glued them onto the back of the illustration boards walls.
You can see int he picture above that I made the mdf shorter then the illustration board to accommodate the sloped of the roof. I glued everything using carpenters glue. Next I glued on small rectangular panels which will eventually be finished with chinoiserie like in my first picture. When they were dry, I covered everything in gesso.

The center section will be a mirrored cabinet with doors to showcase teapots and tea caddies

This is the Fireplace wall, the medallion is a jewellery bit I glued on before painting. Illustration board makes it easier to cut odd shapes like the fireplace opening...I know it's crooked, I fixed it later on

And this is the back of the room
Gesso just helps to cover any joints and protects the edges of the board. Once it set I sanded it and painted the background red and the panels black
3 coats of red all over, then 2 coats of black over the panels
I painted the chinoiserie, but you'll have to wait till my next post for the finished pieces. Oh well...maybe just one bad picture...

The narrow vertical rectangles that were left black will have 3 shelves on them which will hold white vases and chinese teacups with blue and orange designs on them...Yes, I will be learning to work with Fimo! Around the mantel, the black panels and the chinoserie panels I will attach a gold molding strip which is in the mail. The shelves will be gold painted brackets from Sue Cook which are also on the way. If the brackets and molding arrive soon I should have this room finished in 2 weeks...and I have a wonderful gold and white plaster ceiling for the top of the room. I'm working on a parquet floor design...

And that's my progress. There would be more, but I was sick at the beginning of the month, then had my mom and my father-in-law's birthdays, then Ozzy's..
Happy Birthday Ozzy!
...and last weekend our friends had a Blessing for their daughter. I had told them I would make the cake since I made the one for their son, but then they asked Jo and I to be her godfathers so naturally I had to make the cake special...
And that, my patient friends, was July 2012 in the wonderful world of Giac!

Before I go, Some of you chose me for a "You Inspire me" blog award. I thank you all very much for the great honor. I tried very hard to choose who to pass it on to, but there are so many of you I just can't pick. So if you don't mind, I thought I'd do it this way. While every single one of you inspires me...yes..EVERY single one of you ...I decided to mention certain blogs that have helped me, or that I wish I had come upon earlier to help prepare me for Dewell Manor...be it finishing techniques, history or collecting! I hope you explore them and enjoy them as much as I do.

http://www.modernminiatures-whitledge-burgess.blogspot.ca/
   Faux wood finish, illustration board walls, curtains, "The Ultimate Glue"...Without Ray's techniques I would never have made the Manor what it is

http://dollshousesandminiatures.blogspot.ca/
   I wish I had read Andy's posts before I started. His miniatures are wonderful, and his historical period guides are one of the best tools you'll find on the web. I could of saved a lot of time and energy had I read his posts first.

http://www.exquisiteminiatures.blogspot.ca/
   Martha has dedicated her blog to showcasing the artists that have made our hobby great. Each post introduces me to a new artist and she encourages everyone to comment and add information about the work.

http://petitpunt.blogspot.ca/
   Many of Debora's posts are wonderful construction how to's and I've learned a lot of great ideas from her

http://elgakoster.blogspot.ca/
   I just love furniture and look forward to the challenge of making my own someday. In the meantime, Elga's posts show you so many techniques and I will definetely re-read them all before I start.

http://john-merrimanpark.blogspot.ca/

http://miniatureenthusiast.blogspot.ca/
   John and Simon were amongst my very  first followers. Like me, they started blogging about their scratch built projects and I think our projects are very much the same in so many ways...My sign is Taurus and my ascendant sign is Scorpio, so I still get confused by the Gemini-Effect these two have, but the end results always speak for themeselves. ;)

Well, that's what I had for the moment. thank you all, old friends and new, for your support and encouragement. You all know how big miniature projects really are, and it's great to have the priviledge to get to know all of you and all your wonderful artwork...yes, we are all artists!

I send you all the best and look forward to seeing more of your wonderful posts.

Big hug,
Giac