Dollhouse Blogs

Saturday, 7 April 2012

Finished Kitchen, Butler's Pantry and scullery

Hello Everyone!
I hope you're all having a great week. I had the day off Friday, and spent it working on the Butler's pantry, the last part of the kitchen.  I usually just put the furniture in for my posts, but since I've shown you the furnished kitchen before I decided to take out some of my accessories for this one...I don't want to bore you!


The kitchen measures 24" x 20". As I made progress on the manor, I realized the space was big enough to incorporate a scullery and a butler's pantry.

The butler's pantry is the first thing you see when you walk  from the dining room to the kitchen. The first floor of the manor is 14" high so I decided to go as high as I could.
When I was looking up butler's pantries, the one that caught my I had a backsplash and counter top covered with one sheet of copper.The unit measures 9 3/4 inches large, and 11 1/2 inches high. The top part has 4 shelves and glass front doors with locks, and the bottom part has 4 small locked drawers for silver, and 2 larger ones for linen. the bottom drawers are glued on to a base. Because they are at the back of the room I didn't see any reason to make them functional...it is all about illusion after all.

The copper counter and backsplash is 2 pieces of 1/4 inch mdf glued together and covered in embossing copper sheets. I glued them on with The Ultimate Glue and gel Super Glue. The bottom part and counter/ backsplash was easy. What took a little thinking was the shelf section. I didn't want working doors. I don't mind putting in hinges, but the shelves are far enough that opening them and putting in dishes could be a little difficult and I'm afraid I might pull the doors off accidentaly. Once the unit is glued in place this would be difficult to fix. So here is my solution

The shelf unit is glued to the wall, and the front of the unit with the doors just comes right off. You can see in the picture above I glued a piece to go over the top of the unit, drilled holes that went through both, and glued a piece of dowell to the top unit. This way, I just lift off the door section and slip it back into place once I've put all the china in.
Here is my original drawing and the 4 units that make up the bulter's pantry. I faux finished everything in a dark walnut color and glued it into place.

So here is the butler's pantry

the scullery, finished with taps from Sussex Crafts 

the cooking area
and here is the empty room


And now the first and second floors of Dewell Manor are complete, except for lighting and a little detail work I'll talk about next time. I planned on working on the Attic floor the next few weeks, but some real life renovations might take up my time, but I will put up a new post as soon as I can.

To everyone celebrating Easter this weekend, I hope you have a wonderful, chocolat filled day, and to all my friends not celbrating, have a wonderful week. Thank you all for following my blog, for your comments and your support. It is thanks to all of you that I have stayed focused and have accomplished what I have...you are all the best!

Big hugs,
Giac

Sunday, 1 April 2012

Dressing Room and Montreal Miniatures Show

Hello Everyone. I hope you all had a woonerful week. It's been a while since my last post. I just want to thank you all for your wonderful comments and taking the time to follow my work. It means a lot to me and your kind words keep me inspired and focused. So to everyone who has been following my adventure, thank you so much!

Once again I underestimated how long the Dressing Room would take. 3 weeks later I finished:


The room measure 20" x 24". The windows on the fireplace wall overlook the ocean, the back door leads to the Bedroom Hall, the door on the right leads to the Master Bedroom, and the wall we're lookin in from will have a large window overlooking a rose garden.

The room is pretty simple: Wallpaper and ceiling paper, large baseboards and chair rails. I was afraid the room might be a little boring, so I thought I'd put a little extra effort into the floor.
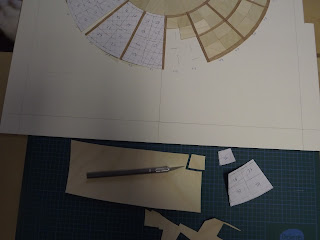
You might remember, when I made the Gallery floor, I glued down one piece of wood with the grain going in the wrong direction. After it was shellaced is stuck out like a sore thumb. I figured I could use different grain directions to make an interesting floor. I drew 1/4 of the design on graph paper and printed several copies. I then put the paper on the wood veneer and cut out each piece with an exacto knive, making sure I payed attention to the direction of the wood grain.

I first glued down the dark wood circles to create the medallion outline. Next I filled in each section. I cut 4 pieces at a time and glued them in place. I think about 20 pieces fit the first time , every other one had to be adjusted or re-cut. When that was done I glued the dark border around the room that matches the one in the Master Bedroom.

The next step was to fill in the the rest of the floor. I went with diagonal slats. Once again I wanted to use the wood grain to create interest. I've mentionned the wood veneers before. You just heat them with an iron to activate the glue. I prefer to touch the wood side of the veneer strip to the iron  for 5 seconds and then put it into place. When I've done about 10 inch section I go over with the iron so the edges my fingers were holding stick down.  
The final step was applying 3 coats of shellac, waiting 30 minutes between coates, and voila
I left it overnight and went over it with Dark floor wax. There is a natural color floor wax, but I like the dark one because it fills in the cracks and makes the floor look used. the next day, I glued it into place.


The fireplace is from Unique Miniatures, and was my very first attempt at faux marbling over a year ago.
The room is big for a dressing room, but in my mind a lot goes on there.


The lady of the house would sit here to have her morning tea listening to the ocean before choosing what to wear. The Corset is by Pedrete. The pictures do not do it justice. It is exquisite!

She would go over the accounts with the housekeeper, approve the menu for the day , and give her instructions for the staff


And finally she would sit at her vanity and get ready, always looking out at the water. The overmantel was made with the window and door trim, crown molding, and a leftover piece of the frieze from the Dining Room

And that's ot for progress...now for shopping.

Yesterday was the yearly Montreal Miniatures Show. I had a lovely time and found some great pieces.

I know exactly which chandelier I want in each room and was happy to find the Sheryl Renee from the Getzans for the Dressing room at the Little Dollhouse Company. The Tea set was an impulse buy from the lovely Janice Crawley...again it was perfect for milady's tea in the dressing Room. The potatoes and trouts I purchased from martha Mclean. She has spectacular pieces.

I love going to the show, but it always makes me antsy to finish construction. I'm enjoying every minute...but I look forward to the day I can just buy accessories to my hearts content. I'm dying to get floral arangements from Martha Mclean, accessories made by Julie from Westwinds Miniatures and...pretty much everybody...Well there's always next year.When I look at the Manor I think it will take me another year to finish it, then about 30 years to accessorize it.

Well, that's it for this week. I've been asked which issues of Miniaturas Dewell Manor is featured in. So far ssue 167 showed the Great Room, 168 the Entrance and staircase, and 169 the Library. i believe they are out in Europe, but not sure when they ged accross the ocean.
 Before I start work on the Attic floor I decided to build a butler's pantry in one section of the kitchen. If I'm not done by next weekend, I just want to wish everyone a very Happy Easter, and happy weekend to those not celebrating, or celebrating the week after. As always, I look forward to seeing your work. You always inspire me with your amazing talent and creative ideas.

All the best my friends, I send you great big hugs,

Giac